Showing posts with label studio. Show all posts

Thursday, March 13, 2014

The Big Studio Reveal--or--"How I Spent My Winter"

I'm finally here to share my studio remodel with you.  It was a long project and it was a lot of hard work, but I enjoyed it, and it was worth every ounce of effort.  I really love my new space.  I hope you do, too!

First off, let me say that there was nothing really wrong with my previous studio.  It functioned.  I had lots of storage.  But as my work has evolved over the years, I've come to understand that my work environment has to make changes as well.  I've always been a 'make do with what I have' kind of girl when it came to furnishing the studio.  And when I did spend money, I was frugal about it.  This time around I decided to make the room special.  To make it feel more like part of my home, rather than just a room full of stuff that I happened to work in.  I wanted it to function, but also be pretty. 

These were the main goals I had in mind when I embarked on this project:
  1. Get rid of the carpet.  Carpet + artist at work = bad idea.
  2. Create separate work stations for different tasks.  I wanted one area to sculpt and another area to do the finishing work. 
  3. Maximize storage.
  4. Create a 'shipping department' where I could store some boxes, tissue, bubble wrap so I wouldn't have to drag it all in from the garage every time I had a package to ship.
  5. And with any remodel/reorganization....PURGE PURGE PURGE!!!
OK--is the suspense killing you?  Are you ready to see it??

 
Nice, huh?  I can't begin to tell you how thrilled I am with how this room turned out.  It's a SMALL room, only about 11.5 ft x 8.5 ft.  I have managed to cram a lot of stuff in this space and still make it look pretty.  I have to say, I'm pretty proud of myself!
 
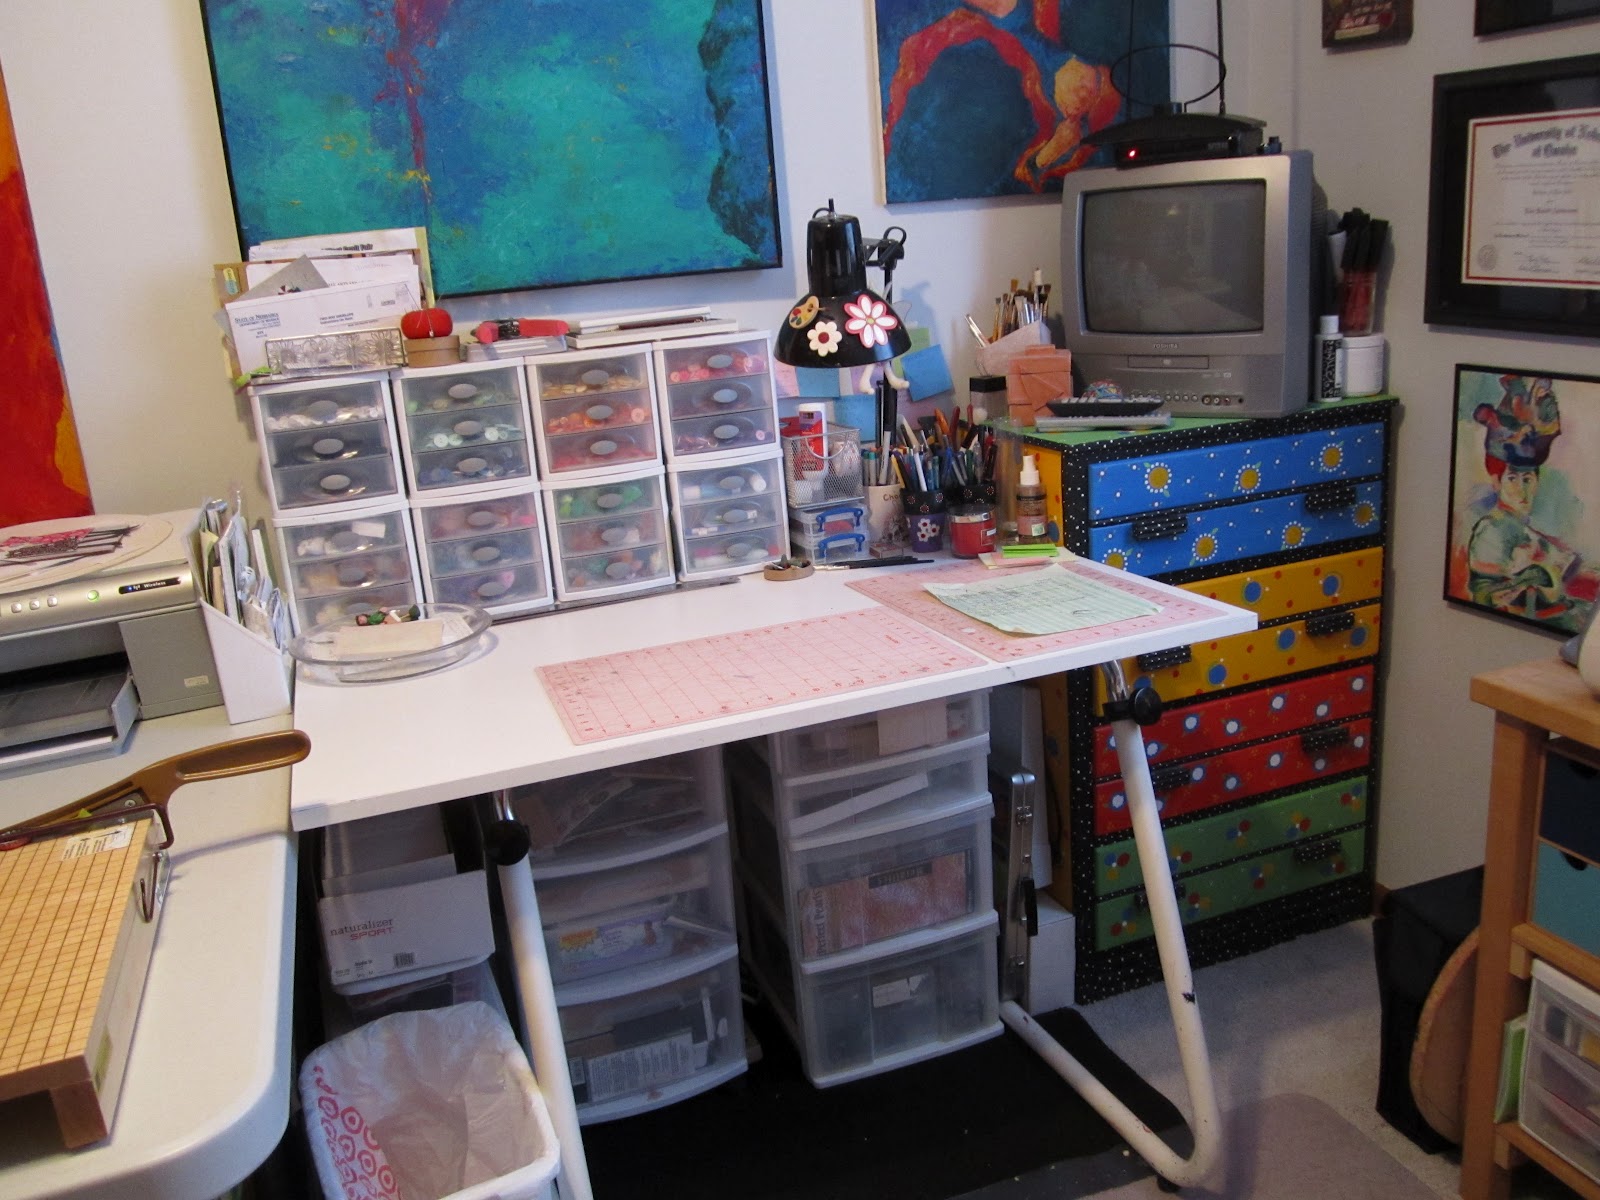
These are the two main work areas.  The desk in the foreground is where I will do my sculpting work.  (I have another chair coming as I type.)  This is the desk I bought from Wayfair that arrived with a damaged top.  I found a very similar one on West Elm that I loved, but it was waaaay beyond my budget at $900+.  This one looks almost identical for about 1/3 the price.  LOVE IT!!  It's spacious and has loads of storage. My good old drafting table I've had for 27 years is still quite functional, and now it is the space dedicated to the finish work, and also to paper crafting, when I get the urge to do that.
 
 
In the corner, in the same place it always has been, is this very old little chest of drawers.  If you recall, it was painted all different colors and patterns in its last life.  A few coats of white paint later, and this old girl looks fresh again.  The six section cube shelf from Michaels fit perfectly on top, to make the best use of vertical space.
 
 
I've had this little table under the window for years.  It was unfinished wood.  I always intended to paint it, and now I finally have!  More storage, and my Cricut.  I love the cube storage system from Michaels.  I realized that every  studio on Pinterest uses them, but hey, they work and look great!  (Oh, I was photo bombed by Penny!)
 
 
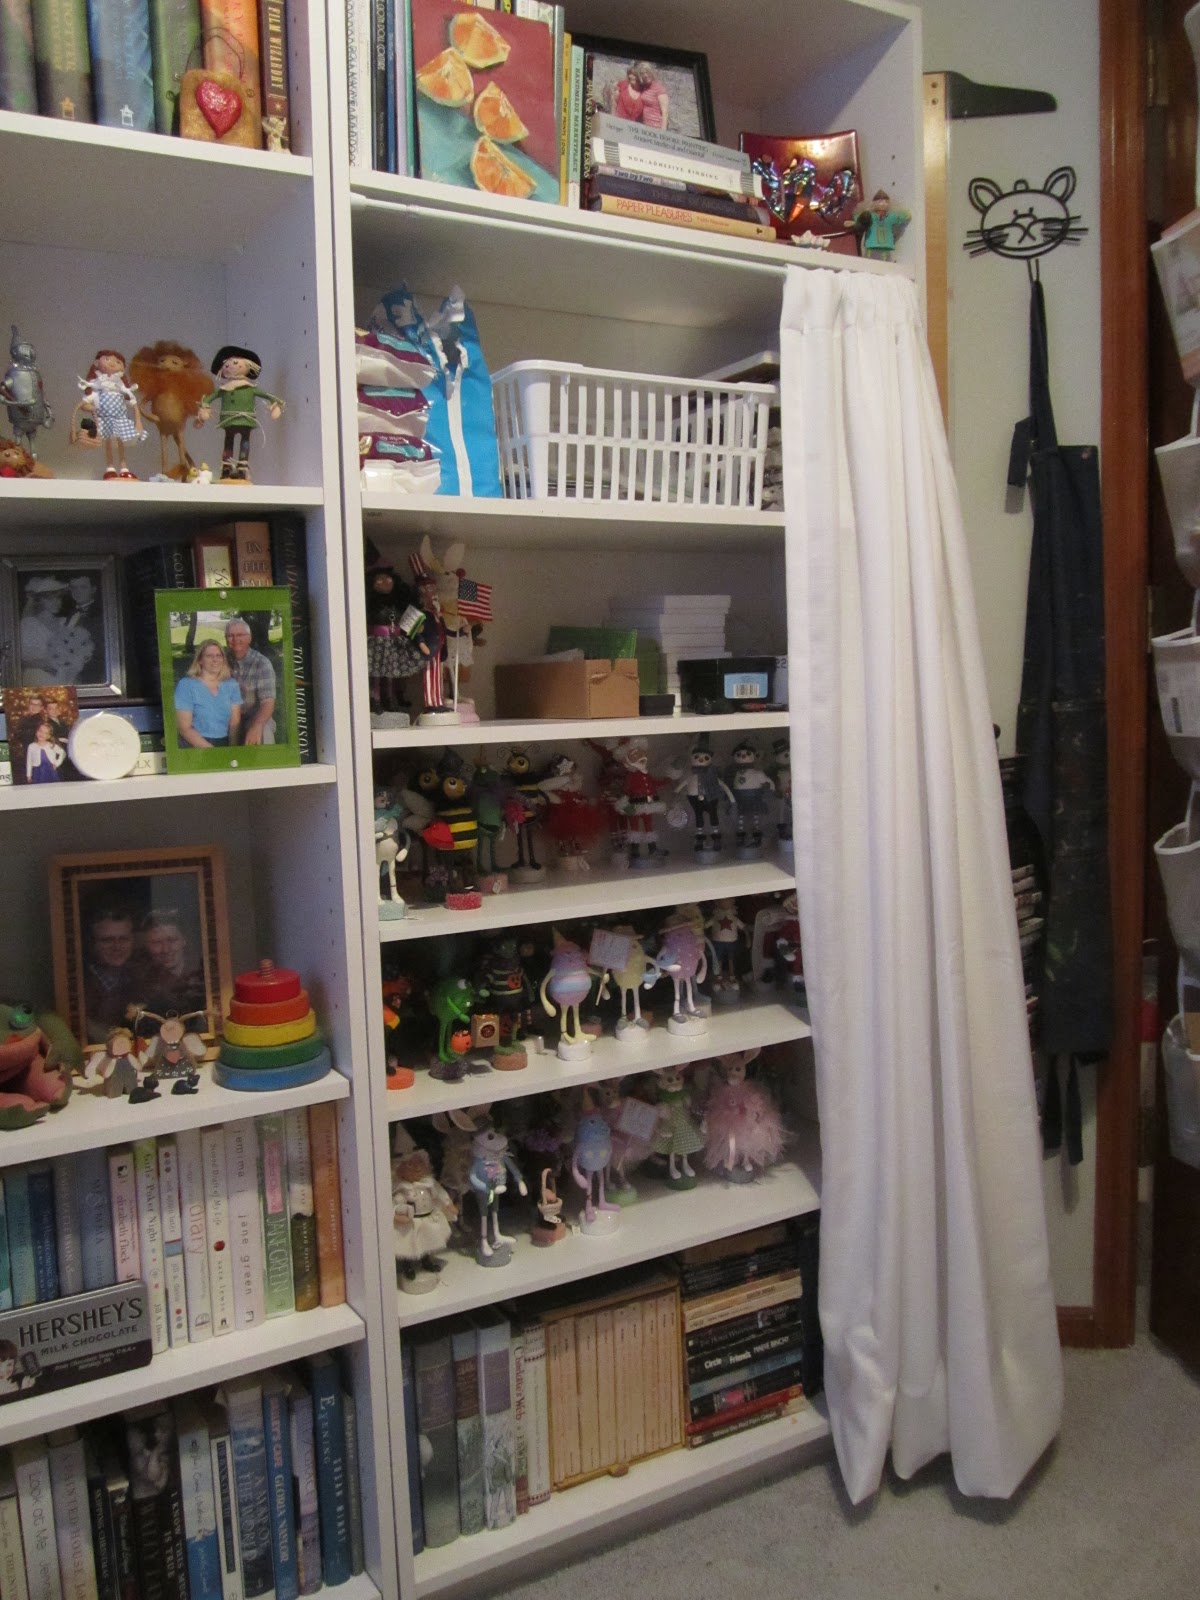
Nothing much changed about this wall.  Why mess with a good thing?  Storage and books and some of my favorite things.  I think it really pops now against the new wall color (which is called Bridal Bouquet from Behr--more on that later.)
 
 
Back of the door storage.  Don't you just love shoe bags?  They are so handy!
 
And now, the biggest transformation of the room (apart from the flooring)... I gotta give you a before of this one:
 
 
Here is the closet, stuffed to the gills with all kinds of things.  The area that got the most purging.  Why are there dried up paints in there?  Who needs about two dozen boxes of Christmas ball ornaments when you don't really make anything with them anymore? 
 
I had inspiration from a studio I saw here on Pinterest.  This woman has a very small workspace, with a closet nearly identical to mine.  I thought, why not take my closet doors off and make better use of the square footage?  The dilemma became where was I going to store all the STUFF.  I'd figure it out....I was going for it!
 
 
OK, so the inspiration room had a built-in, wrap-around counter top.  I didn't want to commit to that--too much work and too much money.  While I was allowing myself to buy real furniture and spend some money this time around, I wanted to be smart about it.  I had this perfectly good, but very small desk.  It fit just right.  Add a really tall stack of my favorite plastic drawers and I gave myself lots of storage.  I even added a light to the closet.  (I had it on hand, purchased for a different project that didn't work out.)
 
 
My husband helped me add some additional shelving to fill with baskets and bins.

 
I tried to make every single inch of space work for me, including tucking one more little shelf way up top.
 
 
About the wall color.  Bridal Bouquet.  I am IN LOVE with the color in this room.  I brought home a giant STACK of paint swatches in all sorts of colors.  Greens.  Yellows.  Purples.  Pinks.  Aquas.  I even considered going all white, because my friend Marian's studio is all white and very pretty.  I was open to anything, as long as it wouldn't fight with my big painting (which is my original work, and my very favorite painting)  I honestly thought a green or a yellow would work the best, but when I put the swatch of Bridal Bouquet up against that painting, something inside me clicked.  I NEVER thought pink would be it!  It skews enough to the coral side of pink, with enough orange in it that it works with the red in the painting beautifully!  I would never have chosen pink for any other room in my house, but this just felt right.  And it makes all the white look even better.
 
 
About the flooring.  It's Traffic Master Allure vinyl plank flooring in Autumn Oak.  LOVE IT!!  It was about the easiest floor on the planet to install.  I did it all myself in a couple of days! Simply score it with a utility knife and snap it to make a cut.  No adhesive required, the planks stick to each other.  A breeze to clean up.  Looks great.  No more worries about clay getting squished in the carpet or spilling paint! 
 
OK--now for some more photos of the good stuff:
 
A grouping of artwork

I made dividers with foam core for my clay storage

In the closet

Storage on the end of the desk

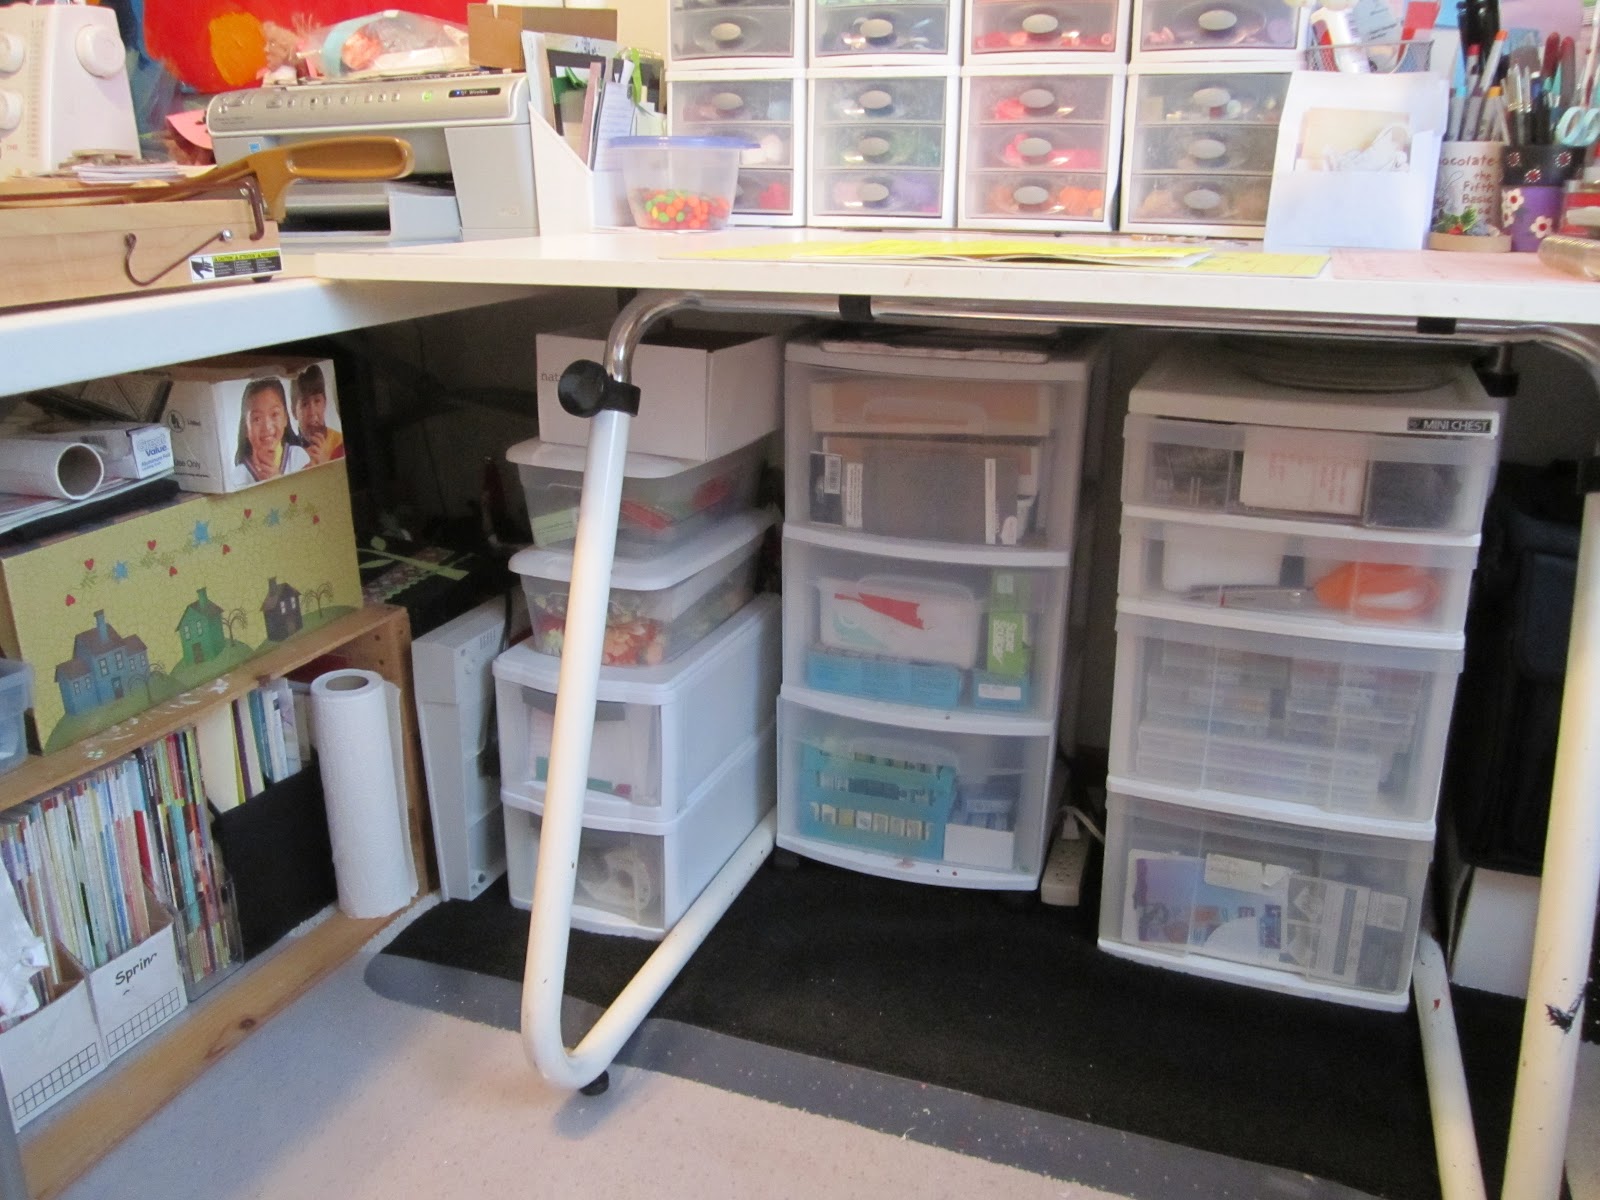
Desk storage.  I filled the open shelves with various drawers

Having the stuff visible in this stack of drawers really bothered me.  It broke up the nice clean look of the closet area, sooo.....

I spent an afternoon lining the insides with white paper!
(as Marian says, I 'major in minors'--yes, I sweat the small stuff!!)

I used a tension curtain rod to hang tissue.  Gift boxes tucked by the printer.  Shipping boxes tucked between the desk and the wall.  The large 'trash can' outside the closet is full of bubble wrap!  Shipping department created! 

Again, sweating the little stuff, but don't these metal baskets look cute with paper liners?

Under the drafting table
My pretty white leather chair.  Having a white chair was VERY important to the aesthetic of the room.  I ordered again from Wayfair.  It arrived BLACK!  If I had wanted a black chair I would have bought one at Office Depot!  They quickly sent me a white one.  I decided I needed one for each work space, so another is on its way. 
 
 
So, there you have it!  A Piece of Lisa has a new studio!  If you lasted to the end of this extremely looooong post, thank you so much!  I would love to hear what you think! 
 
I'm anxious to get back to work!
Lisa


Tuesday, January 28, 2014

Update and The Witches of Giggleswick

Since I was here last, a lot has been going on in the studio.  Not the production of new whimsical, one of a kind art dolls, but a complete remodel!  I have emptied everything out of the room, painted walls and ceiling, built new shelving in the newly-opened closet, tore up old carpet and laid new vinyl plank flooring, added some new storage pieces, sorted EVERY SINGLE THING in the studio, purged what I will never use, organized what I will.  It's all gone fairly well, with one big hiccup.  I ordered a really cool desk online at Wayfair.  I was deeply disappointed when it arrived with a damaged top.  I contacted the manufacturer, per the instructions in the box, and basically never heard from them!  NOT HAPPY!  So I then contacted Wayfair to let them know I had a damaged part, and boy oh boy did they get RIGHT on it!  I had an immediate response and within hours I had a notice saying a new part had been ordered and would be shipped on January 30.  YAY!!  I do hope it arrives unscathed!  I'm so excited to reveal my new studio to you all, but I don't want to share anything until it's complete.  And since the new desktop won't arrive until next week, and I will be on a little trip to visit my friend when it arrives, it will be a couple more weeks before I can unveil! 

In the meantime, there is other news I need to share with you.  Remember the fun blog hop I participated in last fall?  The Witches of Giggleswick?  Well, LeeAnn and Carly with the help of another person, have set up a fun new website that stems from our blog hop.  It is a place where holiday artists and holiday art enthusiasts can meet and mingle and share.  There are forums to discuss all things related to art and to just chat.  There is a marketplace where you can purchase wonderful one of kind works of art.  There will be giveaways and lots of fun.  There are different levels of membership depending on how involved you want to be, but the basic level is free, of course!  It will allow you to get in on the forums and shop the marketplace.  If you love Halloween art, this is the place for you to go! 

Here is the link:  http://www.witchesofgiggleswick.com/

 
Currently in the marketplace I am offering my adorable little witch, Katrina.  There will be more to come.....once I get that studio up and running!
 
 
Have a great day, and try to stay warm!  (That's a real trick in my part of the world today!)
Lisa


Tuesday, July 30, 2013

Things I Can't Live Without

I've been working on lots of wonderful Halloween spooks this month.  It's time for a photo shoot so I can share some of them here with you.  I can't wait to hear what you all think!

Today I'm going to share a bit 'behind the scenes'.  I've shown you my studio, where I spend most of my days. Now I'm going to give you a peek at a few things that really make it happen in the studio...my favorite, can't-live-without-them tools.

 
Every artist has their favorite, go-to tools.  I'm no different.  There is nothing fancy here, just some basic utensils, but I use each of these items in EVERY PIECE I make. 
 
From the top:
 
ROLLING PIN:  This is actually a $1.00 glass bud vase I bought at Walmart.  I actually have about 4 of them.  It is tall and slender and smooth, and perfect for rolling slabs of clay.  Do they make rollers especially for clay?  Yes, they do.  But I started out over 20 years ago using a little juice glass and it worked just fine.  When I broke it and didn't have another, I went on a hunt and found these.  Even better!  It just proves that you don't have to buy specifically branded tools to do the job. 
 
NEEDLE TOOL:  You could also call this a stylus, or a dissecting tool.  It's just a tool with a sharp, pointed end.  I use it to 'draw' in details.  I've got 3 different ones, but this one is my very favorite because the needle is the sharpest and thinnest of the bunch.  If I lost this, I don't know what I would do!
 
FOAM TIPPED BRUSH:  This is my newest addition to the favorite tool list.  You can't see it well in the picture, but it's got a cone shaped tip that ends in a point.  It's actually a paintbrush I found in the doll making department.  It's 'real' use is to paint details on to doll faces without showing brushstrokes.  I use it to smooth out seams in clay and to get in to tight spots where my fingers won't fit--like under arms.  I also use it to sculpt and smooth facial features.  Very handy!  If you are looking for one, it is a Royal Sovereign Ltd. Colour Shaper, Firm.  It came in a package of 5 different shapes.  I use them all, but this one is my favorite.
 
X-ACTO KNIFE:  Again, I would be lost without this basic, handy tool.  I like the pointed end blades the best.  Because I only cut clay with it, the blades last forever. 
 
5" KAI SEWING SCISSORS:  My best friend, Marian, sent me a pair of these. I fell in love with them instantly.  They are the perfect size....not too big and bulky, but not too small either.  They cut both paper and fabric nicely.  To be honest, I lost the pair she sent me.  How, I do not know.  My only guess is that they accidentally dropped in the waste basket and I didn't notice.  I searched high and low for two days, then went online and ordered me another pair.  I love them that much! 
 
NEEDLE-NOSED PLIERS/WIRE CUTTERS:  Self-explanatory here.  I cut wire with them.  I like the pointed-ended ones because I can also bend and shape wire with them as well.  You can see they get used a lot because they have a lot of clay 'gunk' on them.  (Those of you who work with polymer clay know exactly what I'm talking about.)
 
Under it all, my CUTTING BOARD:  My family has a cabinet building business (my parents and brother).  This board is the cut-out for a sink in a bathroom counter top.  It's a Formica top.  It makes a nice surface to roll and cut clay on.  This one, however, is getting a little bit worn out, so I'm due for a new one.  The next one is going to be a scrap of solid surface counter top material.  It will be even smoother and more durable than the laminate.  I've had this particular board for many years though.  It's done its duty. 
 
STOVE:  Obviously, this is non-negotiable, since the clay can't cure without one!  I used to bake in a toaster oven when I was doing miniature figurines.  Now I use a full-sized oven because my pieces are too large for a toaster oven. 
 
OVEN THERMOMETER:  Critical to the process because all ovens heat up differently and tend to fluctuate in temperature.  I've burned many a pieces by not using a thermometer!
 
I have several other tools that serve their purpose in my studio as well.
 
BALL-TIPPED STYLUS: for adding details to eyes and sometimes for texture
4" FISKARS EMBROIDERY SCISSORS: were my favorites until I got the Kai.  I still use these to cut sticky stuff and very thin wire.
TOOTHPICKS: have lots of uses--painting dots, texture, curling wire around
KNITTING NEEDLE:  I use this to smooth clay, add details, even to stir paint!
TWEEZERS: for grabbing on to tiny things like little crystals
VARIOUS PAINTBRUSHES: for painting, brushing on blush, glue.  I even have a big fluffy one I use to dust my pieces off before their photo shoots.
COOKIE CUTTERS:  I have lots of sizes and shapes, but my most used are the circle biscuit cutters to cut the bases for my figurines.
 
These are my basic and most-loved tools.  There are others, but if you are just starting out working with polymer clay, the items on this list will be very helpful.  I know lots of polymer clay artists can't live without a pasta machine.  It aids in conditioning clay and in rolling perfectly even slabs of clay.  Personally, I've never used one.  When I was starting out, they didn't have one marketed to clay artists, and I just couldn't justify the expense of a kitchen model.  I got along fine with my hands and a rolling pin.  Now I can't miss what I never had.  That's a personal preference, and I'm sure many artists would disagree with me on that. 
 
Of everything I use daily, I  would say that my most important tools are my hands and my imagination! 
 
Are you a clay artist?  What are you favorite tools?  What can't you live without?  Do you have tools you don't use?  Is there something you don't have you wish you did?  I'd love to hear from you!
 
Those tools are calling my name!  Gotta go!
Lisa


Tuesday, April 23, 2013

Work in Progress

After spending the last couple of weeks spring cleaning and getting my house and studio back in order, I'm back at work this week.  YAY!! 

I thought today I would give you a peek of a work in progress. 


Any guesses as to who she might be?  One hint:  she is NOT Raggedy Ann...
 
Happy Tuesday!
Lisa


Wednesday, March 20, 2013

Another Trip to My Studio

One of my earliest posts on this blog was a tour of my studio.  Today I'm taking you back there.  There have not been significant changes--at least not ones that you can easily see.  But I have reworked a few of my storage solutions and thought I would share.

I know, it probably looks nearly identical to what I showed you before, but trust me, there have been changes!  Yes, I still have that ratty, cat-clawed chair.  I really need to get a new one....


I have a thing about organization.  I love finding the perfect place to store something.  I love to sort things by color.  I like knowing right where to find something.  That being said, I'm also a very messy worker.  My studio oftentimes looks like a tornado went through it.  I TRY to clean up every day, but that just doesn't happen.  And when I'm in 'crunch time'--the days leading up to a show--all bets are off.  So after a show, when I don't have the pressure to produce, I actually enjoy spending a day or two putting things back in order. 

I've spent some time already this year reorganizing things.  Sometimes you have to live with a chaotic system before you find the right solution.  It helps to work in a space and learn what supplies and tools you want the easiest access to before you make changes.  And those things can vary over time, I've learned. 

Earlier this year I went through nearly all of my supplies AGAIN and sorted and resorted all my wonderful plastic storage drawers.  I also needed to come up with a solution for storing my finished work.  I wanted to have access to it in my studio.  I didn't want it stored in the garage or the basement.  But my studio did not have room for one more piece of furniture to store them.  What to do?

I decided to sacrifice some space on my book shelves.  But I didn't want to just line them all up on the shelves.  That wouldn't look pretty.  I like my bookshelves to look orderly and nicely arranged and interesting.  My solution:  a curtain!

 
I found this simple white curtain at my favorite store, Target.  It wasn't exactly the right length.  It was too short to hang from the top and too long to hang from the second shelf.  I decided too long was better than too short.  I still need to hem it, but for now, I've just got it pinned up.  I hung it simply with a tension rod.
 
 
Pull back the curtain and you can see I've added a couple more shelves so I have plenty of room to store my finished work.  Right now I have a few other random things stored behind the curtain, and I still have one shelf filled with books.  As I need the space I will find new homes for those things. 
 
 
All my little critters are lined up.  It's so much nicer to have access to them, but not have them covering every surface of the studio.  This system works....for now.....you never know with me when I am going to switch things up again in the studio!
 
 
Now that the studio is back in order, it's time to mess it up again!  LOL!! 
I would love to hear about your work spaces.  I'm always intrigued by how other artists work.
 
Lisa
 
OK---I'm NOT PROUD of this picture, but thought I would show it anyway.  This is what my studio looked like after the holiday season was over.  I KNOW!!  How does one function in such chaos?!  This is definitely at its worst.  Most days you will find it at some level between pristine and this:
 
 
(I'm so glad my mother doesn't read my blog....)


Wednesday, June 6, 2012

My Studio.....On a Perfect Day

I love looking at pictures of artists' studios.  I find what they choose to surround themselves with in their work environment fascinating.  Do they like a space full of clutter?  Do they like everything put away in a pristine space?  Is the room full of secondhand finds or filled with sleek modern furnishings?  Do they decorate, or is it only full of necessities? How do they organize their supplies?  Are they forced to work in a tiny corner tucked in a room of their house, or are they fortunate enough to have a whole building at their disposal?  Just like the art they create, I have found that each studio is unique.  Today I'm going to share my studio with you.

I'm not blessed with square footage.  My studio is contained in a bedroom of our home.  It measures 11 feet 6 inches by 8 feet 10 inches, but I lose some space because the doorway is angled across one corner.  So, not very big by anyone's standards.  But I've made it work.  It's been through several rearrangements over the years, but last year I think I finally found the best solution. 

In March of last year I EMPTIED the room except for my drafting table that was too awkward to get through the door, and two tall heavy bookcases I didn't want to move around too much.  I had spent a WEEK plotting different arrangements on graph paper, with little cutouts of all the furniture that must go in.  It was tricky, but one day something finally clicked.  After hauling everything out, I spent another TWO WEEKS putting it all back together.  When it was done, I was almost afraid to work in there, because I didn't want to mess it up!  (Truth be told, I'm a very messy worker.  I'm trying to get better about clearing up each day when I'm finished, but that doesn't always happen.)

After days of purging supplies I didn't need, and sorting everything I did, I found a place for everything, and managed to make it look fairly good.  It's still a bit more crowded than I would like, but everything in this room either has a function, or it's something I LOVE. 

So, here's my studio.....on its very best day:


This view was taken from the doorway of the longest wall.  I have a small desk for my sewing machine, a folding table juts out from the wall to hold my printer and paper cutter, and beside that is my main work area, a drafting table my husband bought me shortly after we married.  All the art work on this wall is my own.


Looking back toward the closet, which is filled to the gills with 'stuff'. (Oh, you can see the ratty chair.  I have a cat.  With claws.  And she's done a number on it.  Rather this than my couch!)


A closer look at my work table.  I LOVE little plastic drawers, and I think whoever thought of making them is a GENIUS.  I have tons of them, as you can see.  The tiny ones on my table hold open packages of clay and buttons sorted by color.  (I love to sort things by color!)  I painted an old wooden chest that has been around in my family for as long as I can remember.


No space goes unused in my room.  I have more drawers under the table (it's a deep table).  These hold my clay and lots of paper crafting supplies.


My Cricut (another gift from my husband) is handy on the table under the window.  More drawers....these FULL of ribbon.


Hard to get a good angle of this whole wall.  It's about 8 feet.  More storage and my two big bookcases full of books and 'fun stuff' that I love.  You can see a tiny peek of the border I painted around the ceiling. 


I was thrilled when the stack of cubes, the two stacks of drawers and the bookshelves all lined up in height.  I'm sort of a dork about things like that, and it was just a happy accident!


I think shoe bags are particularly handy, and not just for shoes (although I have several that do actually hold shoes).  This one holds tools, my Cricut cartridges and other odd things.


One more view of the stacks.  The cubes are filled with paper.  The shallow drawers hold rubber stamps, more embellishments, and my paper scraps sorted by color (because you NEVER throw away your scraps!).  The deeper drawers have more ribbon----yes, more ribbon--acrylic stamps and other assorted embellishments. 


In a perfect world my room would always look like this.  Sadly, it does not.  In an even more perfect world, I would have a space about four times this size, but that's not going to happen.  I do love my work room.  Lots of wonderful things have happened in here, and there is lots more to come.

What sort of space do you work in?  Is it messy or perfectly organized all the time? 

I'm off to my studio!  Have a great day!
Lisa